Adsense-HeaderAd-Script


Advertisement #Header

13 Jul 2015

What is the difference between em and rem in CSS


Both em and rem  are used to create dynamic design html pages so that it can adapt to different device size formats like for smartphone, tablets, laptops, or very large screen desktops.
Both em and rem is derived from the computed font-size value of the element. And if no font-size is derived from that element or inherited from parent elements, then the default font-size value of the browser is taken (usally 16px).

Eg:

?
01
02
03
04
05
06
.d01 {font-size: 40px; height:2em;}
.d02 {font-size: 20px; height:2em;}
.bord-v {border:solid 7px violet;   text-align:center}
.bord-i {border:solid 6px indigo;   text-align:center}
.d01 {font-size: 40px; height:2em;}
.d02 {font-size: 20px; height:2em;}


.bord-v {border:solid 7px violet;   text-align:center}
.bord-i {border:solid 6px indigo;   text-align:center}
?
07
08
09
10
<div class="d01 bord-v">
    <div class="d02 bord-i">TEST d02
    </div>
</div>
TEST d02

At element d02


Now derived font-size = 20px
Computed Height = 40px

If class .d02 doesn't exist, then it inherits from .d01


Now  derived font-size = 40px
Computed height = 80px 

If both class .d02 & .d01 doesn't exist, then it inherits from default browser


Now  derived font-size = 16px
Computed height = 32px

Why rem ?

em has a issue, it gets multiplied for each inner elements or cascaded elements, but rem is based on the root font-size and  so doesn't have cascaded effect.

?
01
02
03
04
05
06
07
08
09
10
11
12
13
14
15
16
17
18
19
20
21
22
23
24
25
26
27
28
29
30
<html>
TEST html 'em','rem'
<head>
    <style>
        html {font-size:6.25%}
        body {font-size:14em}
        .d1 {font-size:2em}
        .d2 {font-size:2em}
        .d3 {font-size:2em}
        .d4 {font-size:2em}
         
        .bord-v {border:solid 7px violet;   text-align:center}
        .bord-i {border:solid 6px indigo;   text-align:center}
        .bord-b {border:solid 5px blue;     text-align:center}
        .bord-g {border:solid 4px green;    text-align:center}
        .bord-y {border:solid 3px yellow;   text-align:center}
        .bord-o {border:solid 2px orange;   text-align:center}
        .bord-r {border:solid 1px red;      text-align:center}
    </style>
</head>
<body><br>TEST body
<div class="d1 bord-v">TEST d1
    <div class="d2 bord-i">TEST d2
        <div class="d3 bord-b">TEST d3
            <div class="d4 bord-g">TEST d4</div>
        </div>
    </div>
</div>
</body>
</html>


TEST html 'em','rem'


TEST body
TEST d1
TEST d2
TEST d3
TEST d4

Output for em


Output for rem


Quick way to Install Wordpress into Remote Linux Server

To transfer any file to the remote server via FTP you will notice that it takes less time to upload a  7MB file than 1500 files with a total of 7 MB file size.

So its best to upload the wordpress-4.#.#.zip installation file to the remote server than sending the whole extracted package.

But the issue then would be How to extract the file in remote server?

It can be extracted if you have a  Shell access privilege User account in the remote server.

Then download PuTTYa client terminal for SSH connection.

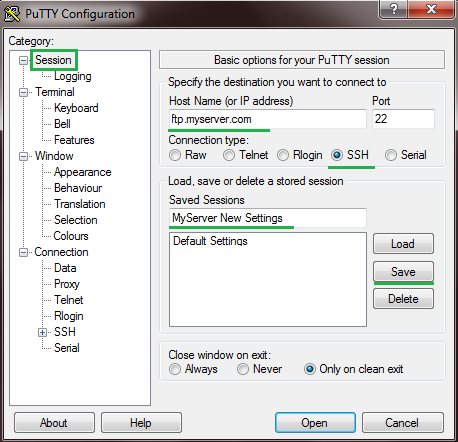
Open the putty.exe,  and click 'Session' on left menu, Enter Hostname of your remote server or IP. Set Connection Type as SSH.

If you want to reuse this connection multiple times, save this session and load it next time you need it.

Enter the Session name in Saved Sessions and Click Save.

Now click on the 'Open'  button to connect to remote server.


Now since its your 1st time connection using putty to remote server, it gives you a Security Alert, click Yes to continue. (Its best to cross check the server fingerprint key).


To Login, type in username and then the password in Putty Terminal


Now once you are in the remote server, traverse to path where you uploaded the wordpress-4.#.#.zip file and then type   unzip wordpress-4.2.2.zip   to extract all its content.

If you dont want the folder wordpress and move all its contents to the current directory www/myserver.com type  mv wordpress /* .  


Now this is a quick way to install wordpress to remote linux server from a Windows machine, but there is another better way, since you already have a Shell access.

Using SSH to Download and Install Wordpress Directly from Remote Server

Find out the latest Wordpress file in the download page. Copy either the .zip or .tar.gz format link

 https://wordpress.org/latest.zip       or        https://wordpress.org/latest.tar.gz 

Login using PuTTY client with SSH like steps shown earlier and then
type   wget https://wordpress.org/latest.tar.gz  

and if you selected .zip format then follow steps as earlier to extract and if you have selected .tar.gz format type   tar -zxf latest.tar.gz  


Now if you dont have shell access then there is another alternative.

Using PHP to download and extract Wordpress into Remote Server

Create a php file and then use exec  function to run the linux commands from inside the php code.

To download use the code
 exec("wget https://wordpress.org/latest.tar.gz"); 

and to extract use the tar or unzip linux command as shown above in the exec("") function.